Photoshop Presentation
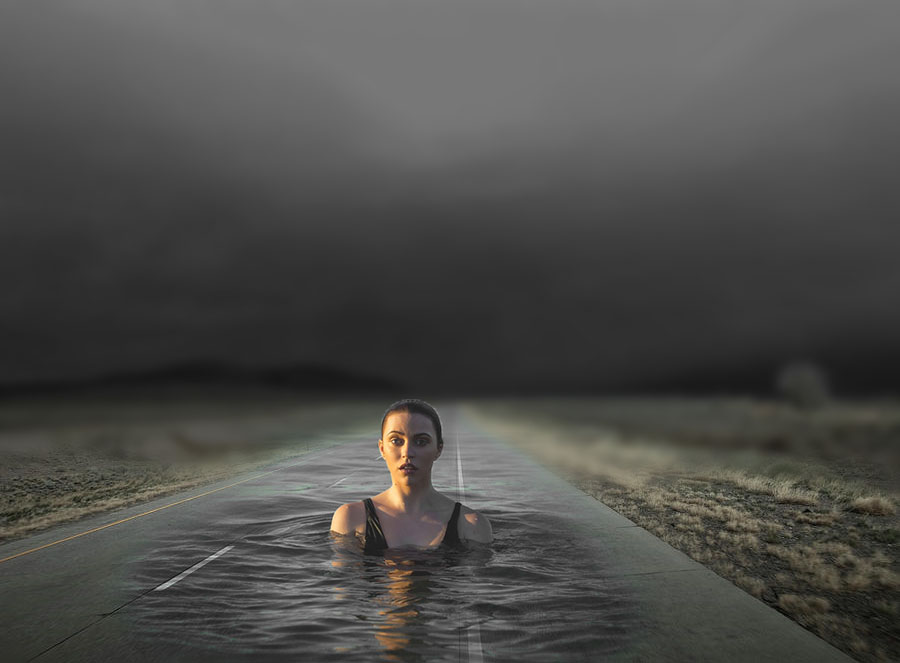
My presentation demonstrated how to seamlessly blend two images together. The two images I decided to combine were as follows;

Road 
Swimmer
We can take these two photos and make it seem as though the swimmer is coming out of a road made from water in 23 simple steps!
- Open the road image in Photoshop.
- Firstly, we want to extend the road image vertically. For this, access the Crop Tool and extend the top of the image.
- Select the Rectangular Marquee Tool and select the new space, as well as part of the top of the existing image.
- Go to Edit: Fill and ensure that “Content Aware” is selected in the “Content” section before pressing “OK”.
- Deselect the area (Ctrl+D).
- Go to File: Place Embedded and choose the image of the swimmer.
- Extend the photo and move it so that it covers the bottom third of the background image.
- Now we need to select the model. For this, choose your Quick Selection Tool and click within the model until she is completely selected. (It doesn’t have to be perfect!)
- Now, click the Layer Mask Icon. It is underneath your Layers Panel and looks like a small camera.
- Choose your Brush Tool, ensuring that opacity is at 100%, hardness is at 0%, and the size is around 200 pixels.
- Ensure that the Layer Mask is chosen, and that the foreground color selected is white.
- Paint around the model to add some of the water into the image.
- Choose your layer with the swimmer and copy it (Ctrl+C). Paste it so that you have a copy of said layer. (This whole process can be done in one step by choosing Ctrl+J).
- Choose the original swimmer layer (the bottom one) to work on.
- Change the blending options of the original layer to “Hard Light”. This will be above your Layers Panel where it currently says “Normal” with a drop-down menu.
- Choose the Layer Mask again and paint more around the model. This blending option allows for your selection to blend better with the background and will combine the images smoothly.
- Change the opacity of the original swimmer layer to around 65%.
- Now that the images are blended, we will want to group the swimmer layers together so that we can work on both of them. To do this, hold the Shift key and choose both the layers and then hit Ctrl+G to group the layers together.
- Go into Properties and select Hue & Saturation for the grouped layers.
- Under “Preset”, change the drop-down menu of “Masters” to “Cyans”, and change the Saturation to -100. Do the same to the “Blues” in the drop-down menu.
- Now we will add a blur in the background to really bring the image together. To do this, select the background road layer and convert it to a Smart Object.
- Then, go to Filter: Blur: Gaussian Blur, and keep the Radius around 5 pixels. (To make the blur appear you may have to make your layer invisible and revisable).
- To remove the blur from the foreground, select the Smart Filters layer and choose the Brush Tool. Ensure that your foreground color is now Black and color the bottom portion of the image that is underneath the swimmer.
The Finished Product
After all steps have been completed, the finished image should look similar to this:

You May Also Like
Photoshop, The Second Lesson

Photoshop, The Third Lesson
